Last year I purchased a smart garage opener with a camera. I looked forward to controlling my garage door with my phone, but soon discovered that their Android app did not work. I decided to ship it back and build my own.
This garage door opener is built with a Raspberry Pi, NoIR camera, 5V relay,
and a magnetic contact switch. With two docker run commands you get motion
capture and an API for the relay and contact sensor. You can easily integrate
this into Home Assistant, or use your phone to
automate your door with
Shortcuts (iOS) or
Tasker
(Android).
Shopping
WARNING: affiliate links ahead
- Raspberry Pi 3 B+ and Micro-USB power supply
- 16GB microSDHC card and SD card reader
- 5V Relay module - I used this two channel relay because it was cheaper
- Magnetic contact sensor
Night vision camera:
Other tools and supplies you may need:
- Jump wire
- 100' 20 gauge hook-up wire
- 30-20 gauge wire strippers
- Wire nuts
- Foam tape
- Screwdriver
- Drill
- Tape measure
On the cheap: Use a Pi Zero W and skip the camera functionality. Zero W’s are currently $5 in-store at Micro Center
For multi-door garages: You need one relay channel per door. Buy more contact sensors and more wire
Prepare your SD card
- Download Raspbian Buster Lite
- Write the image to your SD card
- Set up wireless access and enable SSH
- Insert the SD card into your Pi
Assembly
Refer to pinout.xyz for a Raspberry Pi pinout diagram
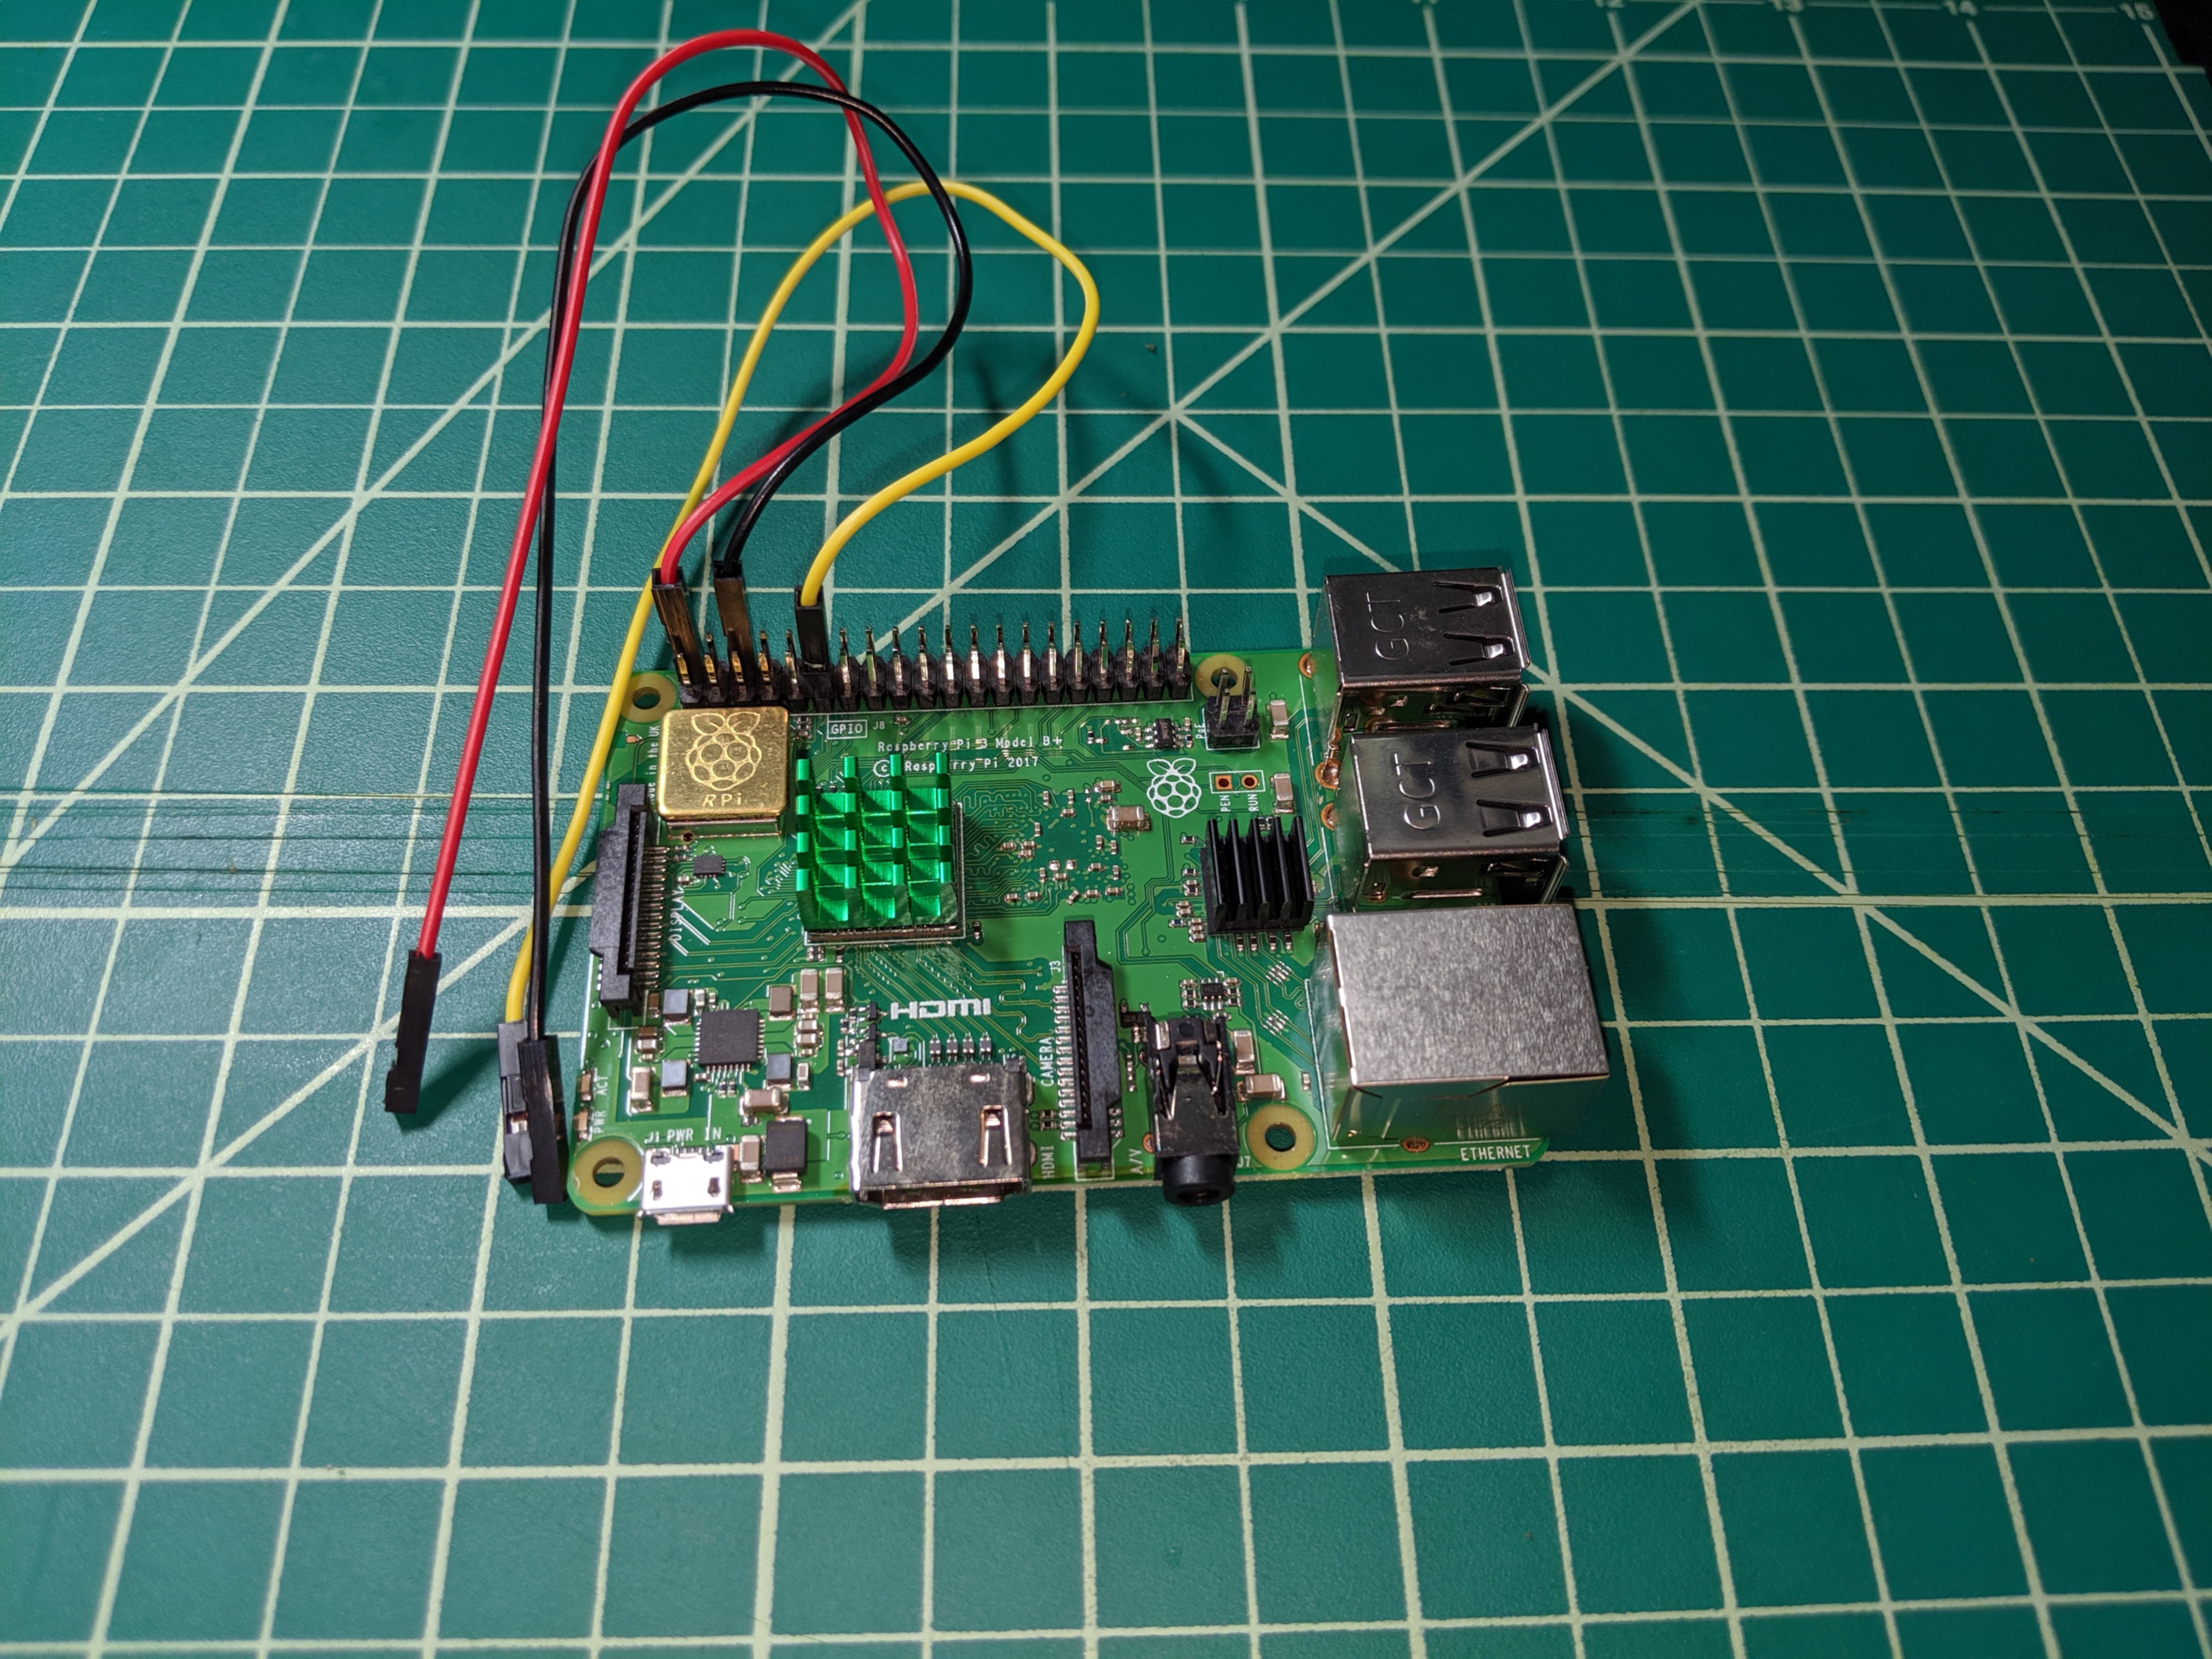
Step 1: Add jump wires for the relay module
- Connect red wire to 5V
- Connect black wire to ground
- Connect yellow wire to BCM 17
Step 2: Add jump wires for the magnetic contact switch
- Connect wire to BCM 24
- Connect wire to ground
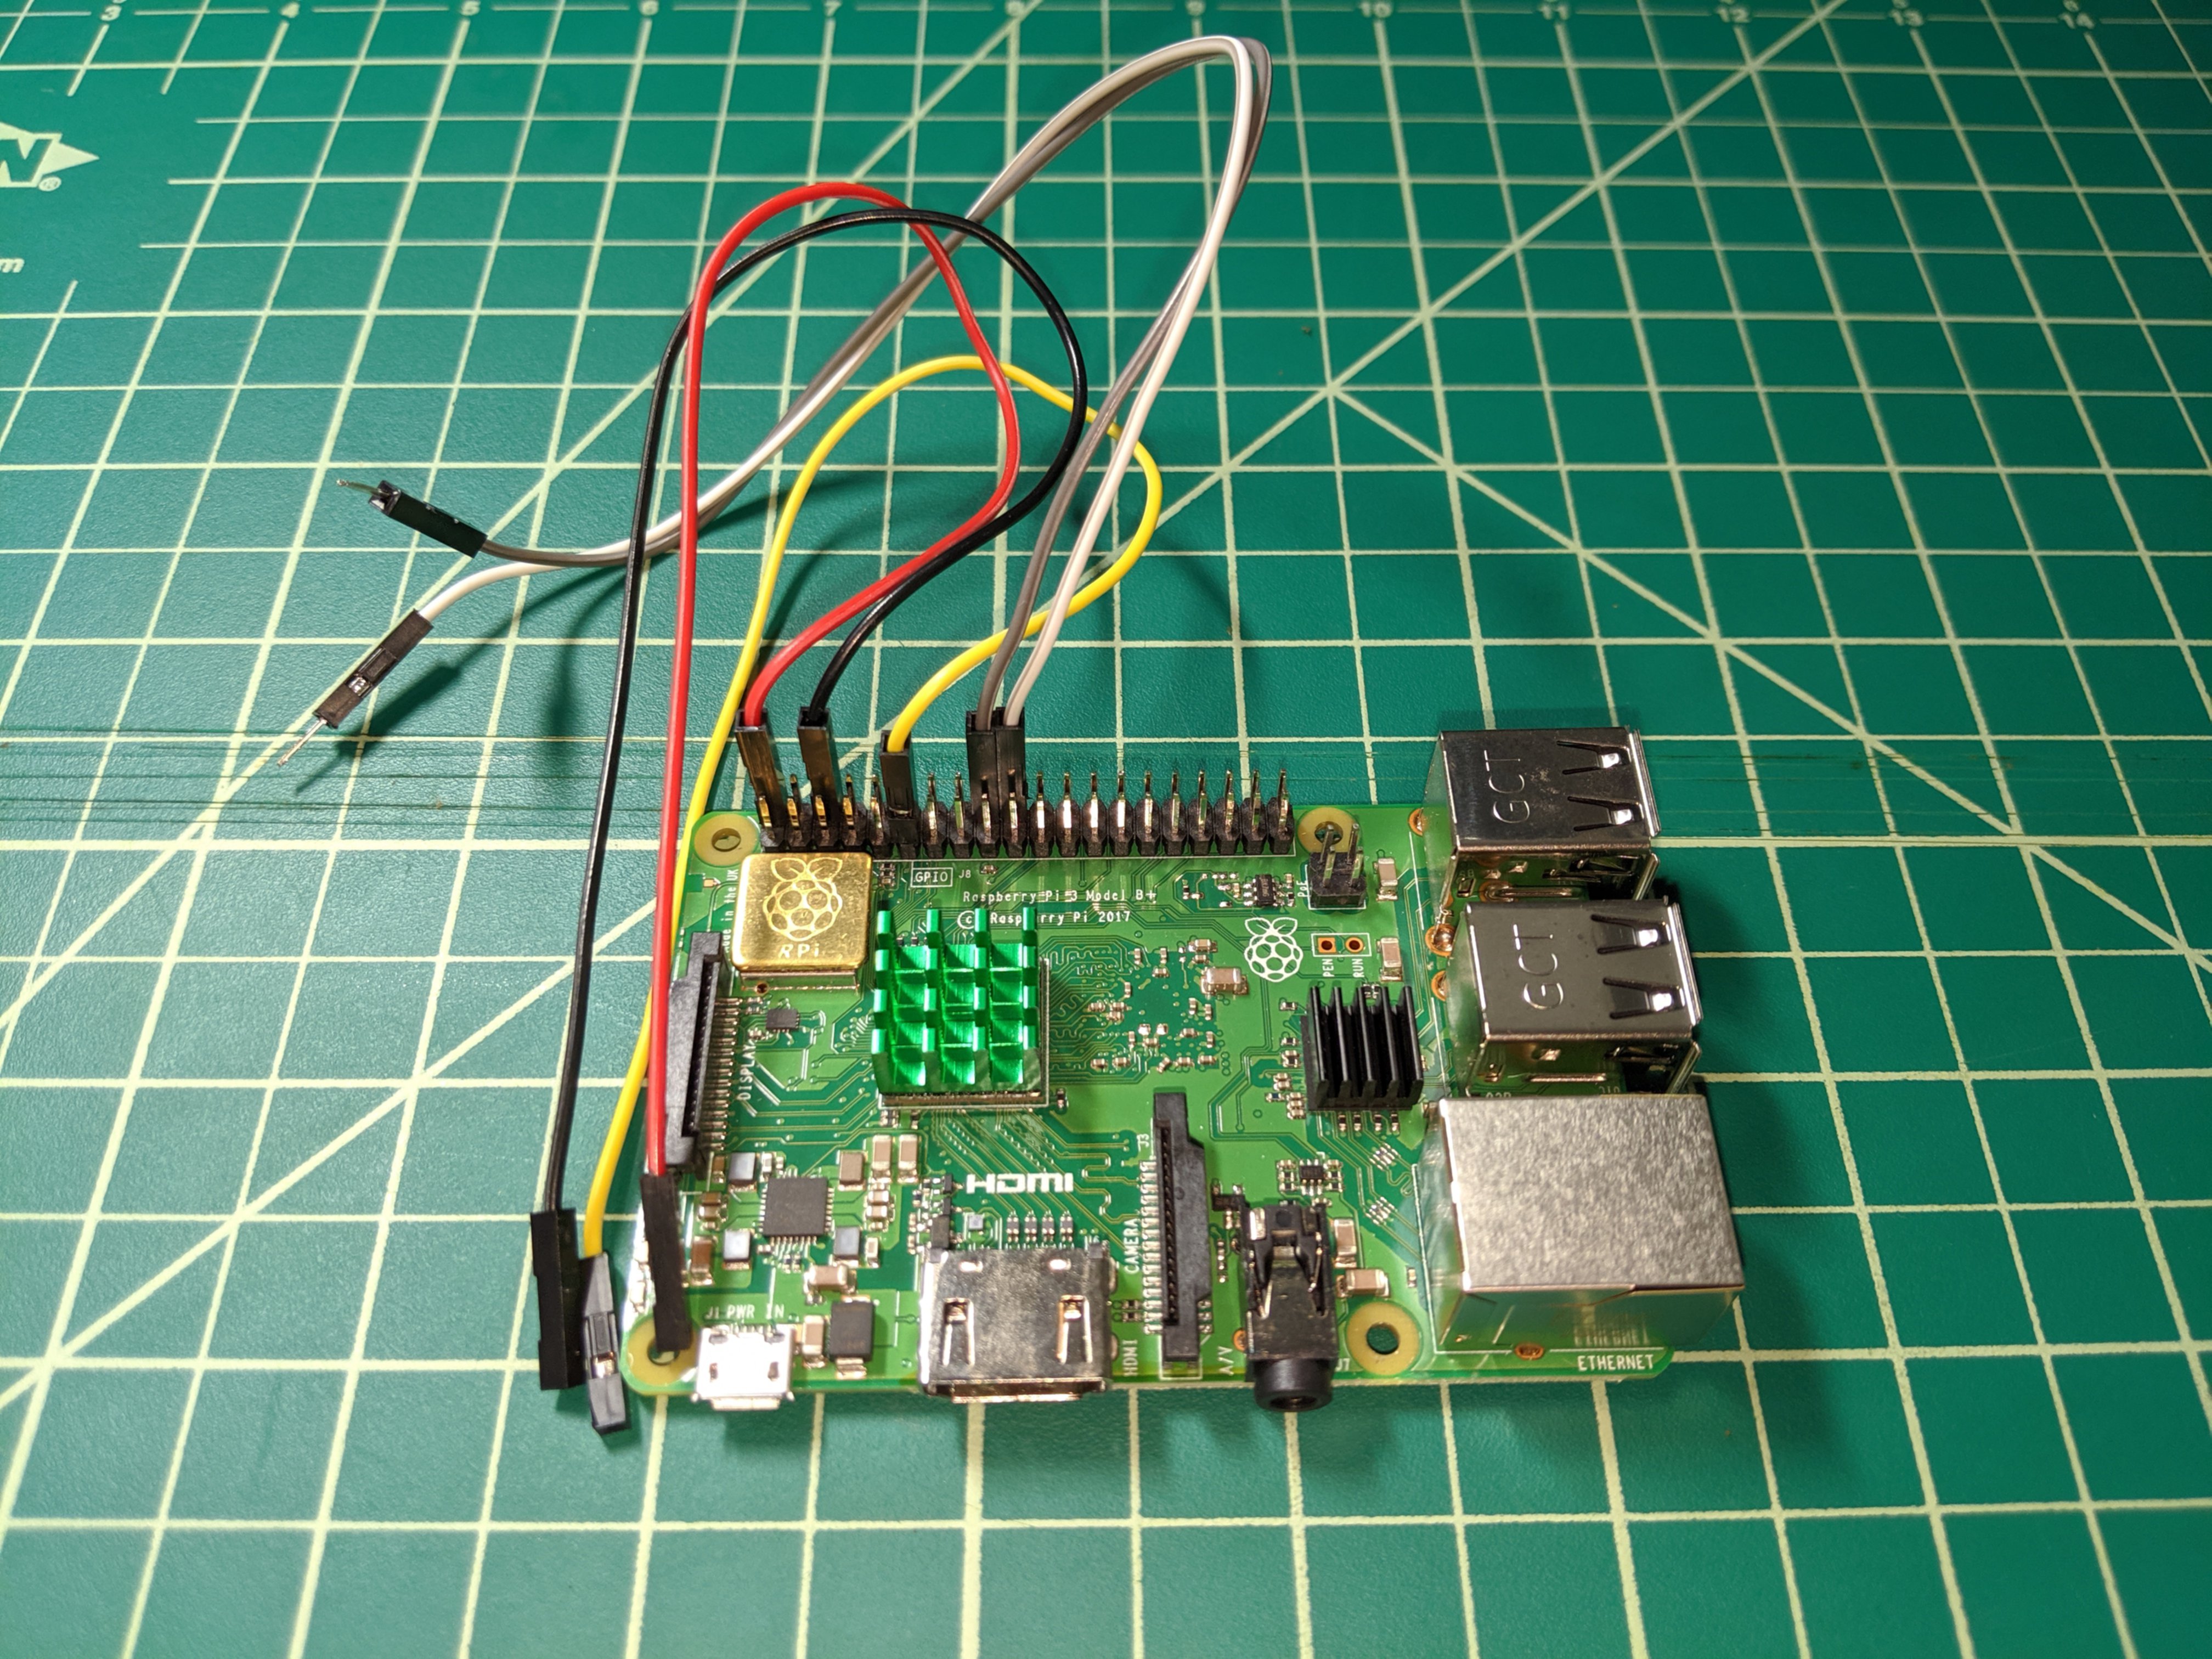
Step 3: Connect the camera
Step 4: Insert Pi into bottom half of case. Snake jump wires and camera through top half of the case, close, and secure on bottom with two screws
Step 5: Attach camera module to lid, secure with screws, and close
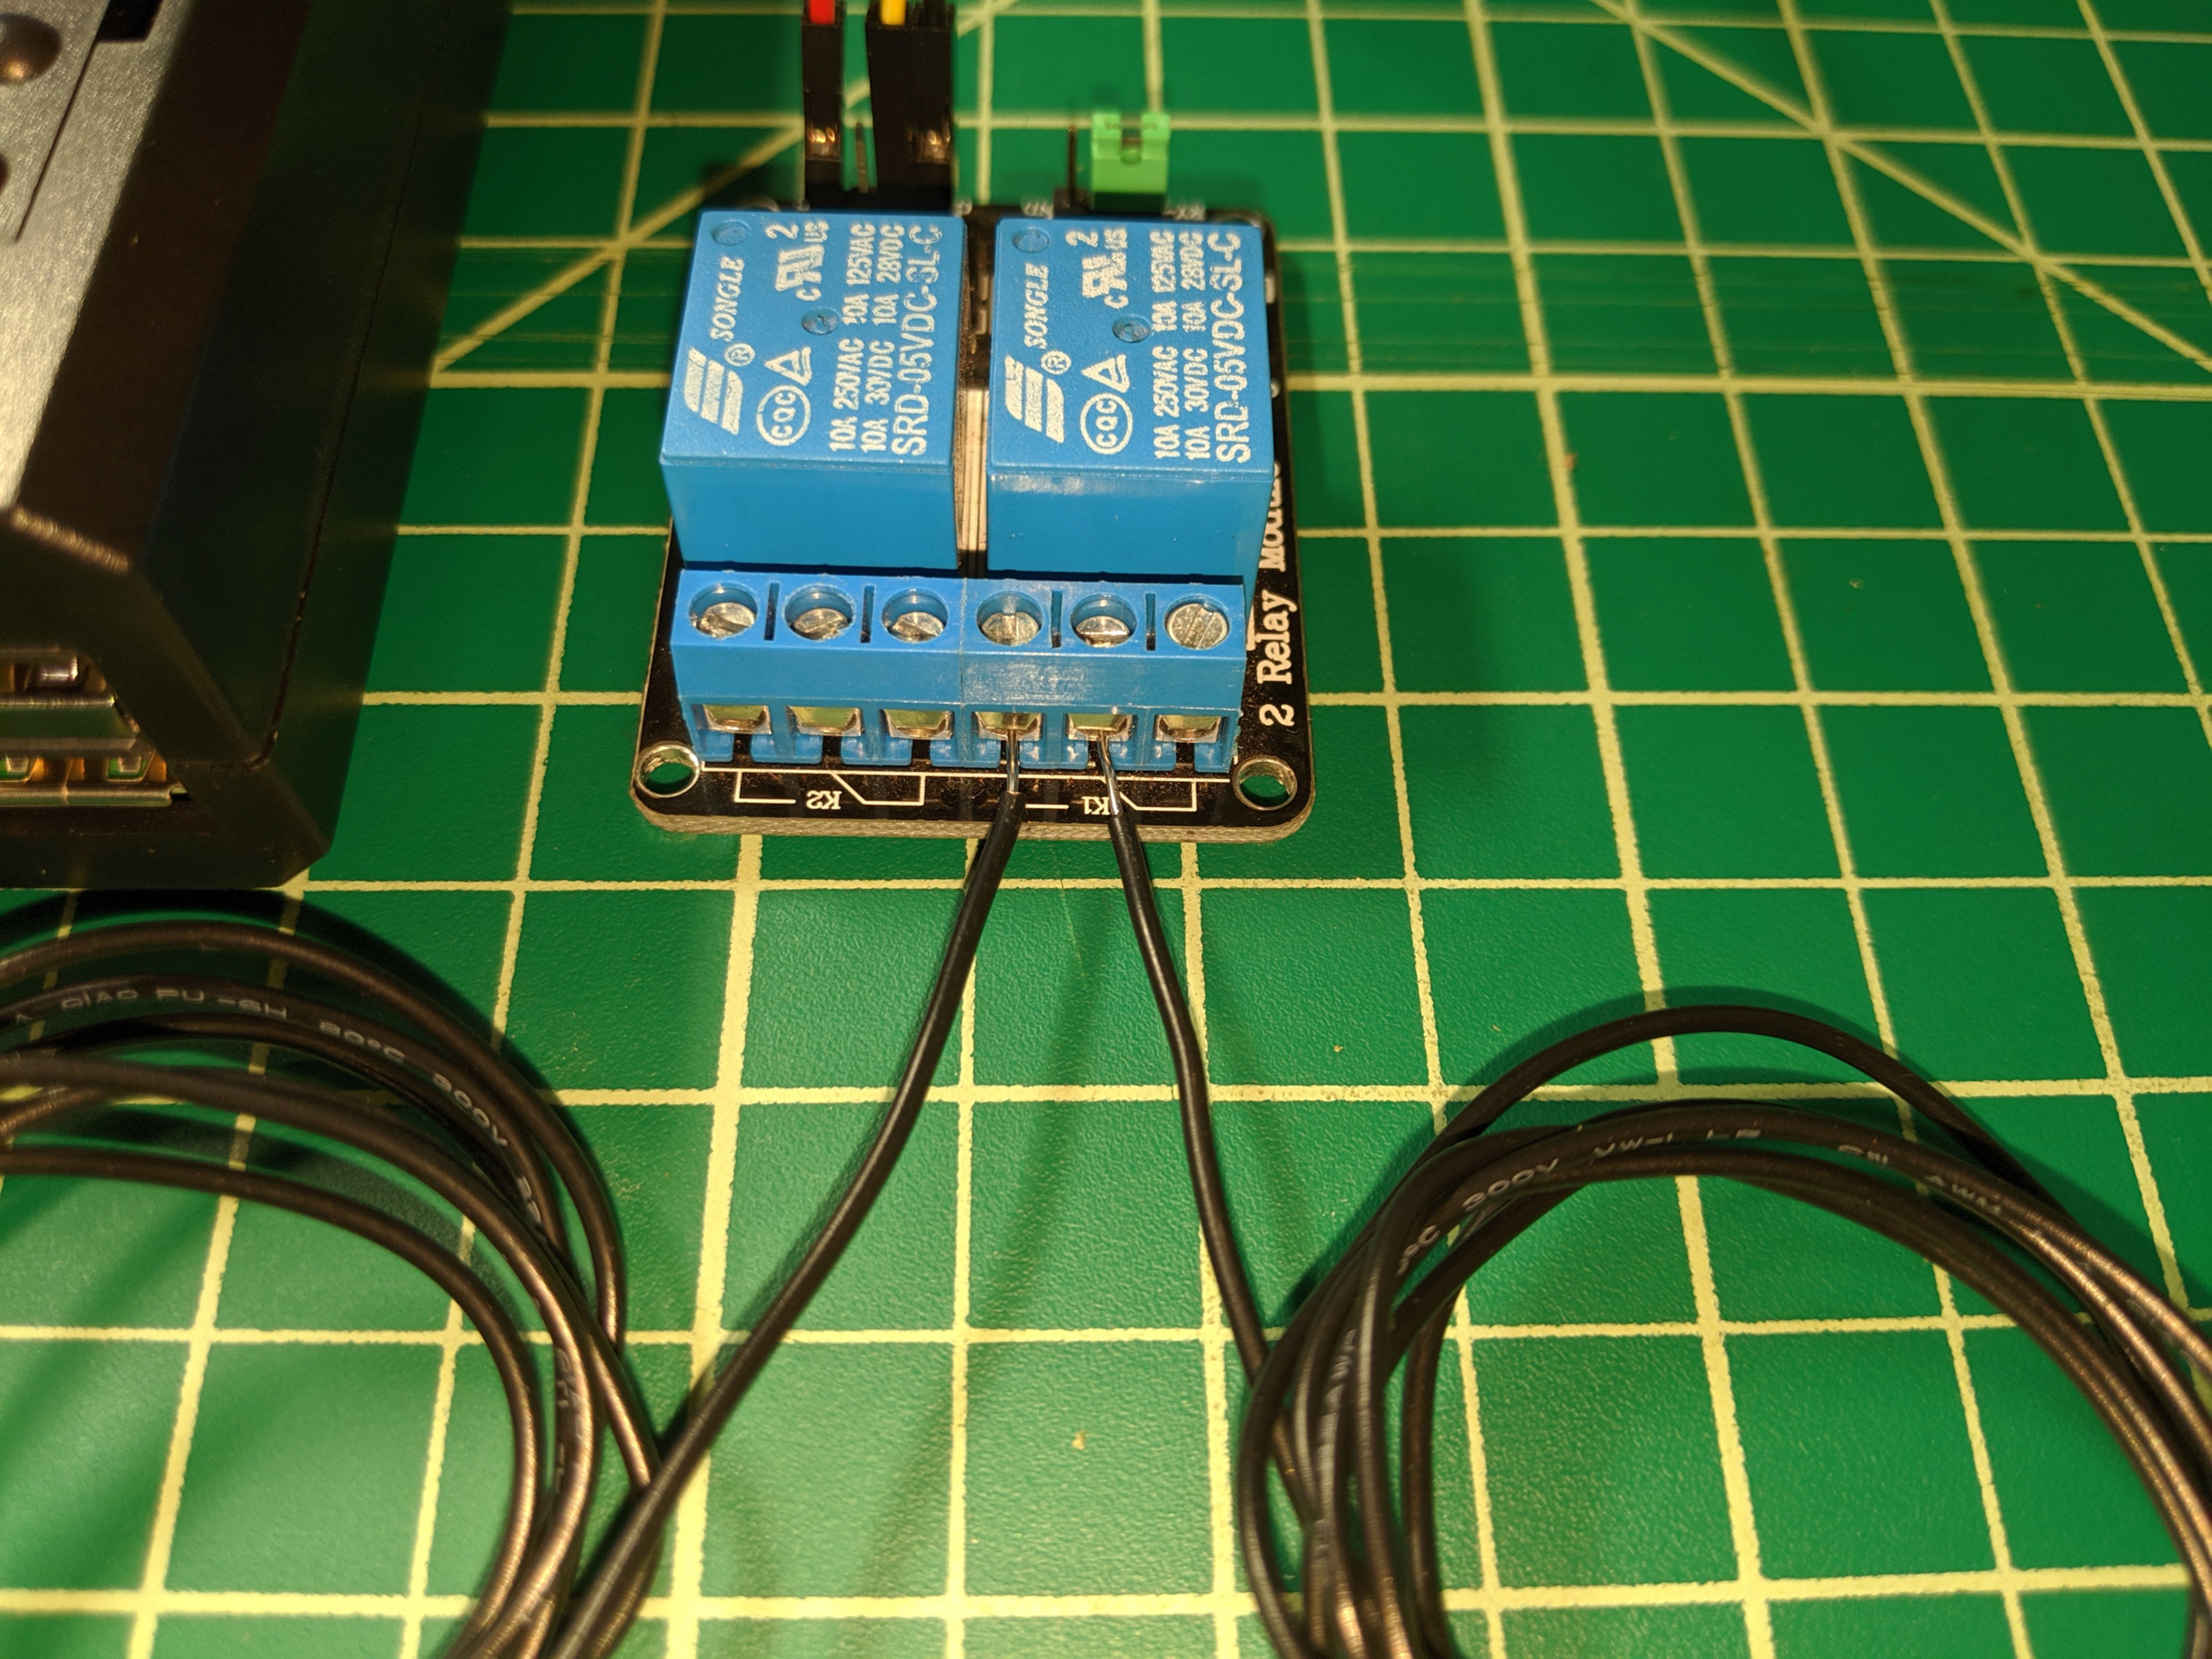
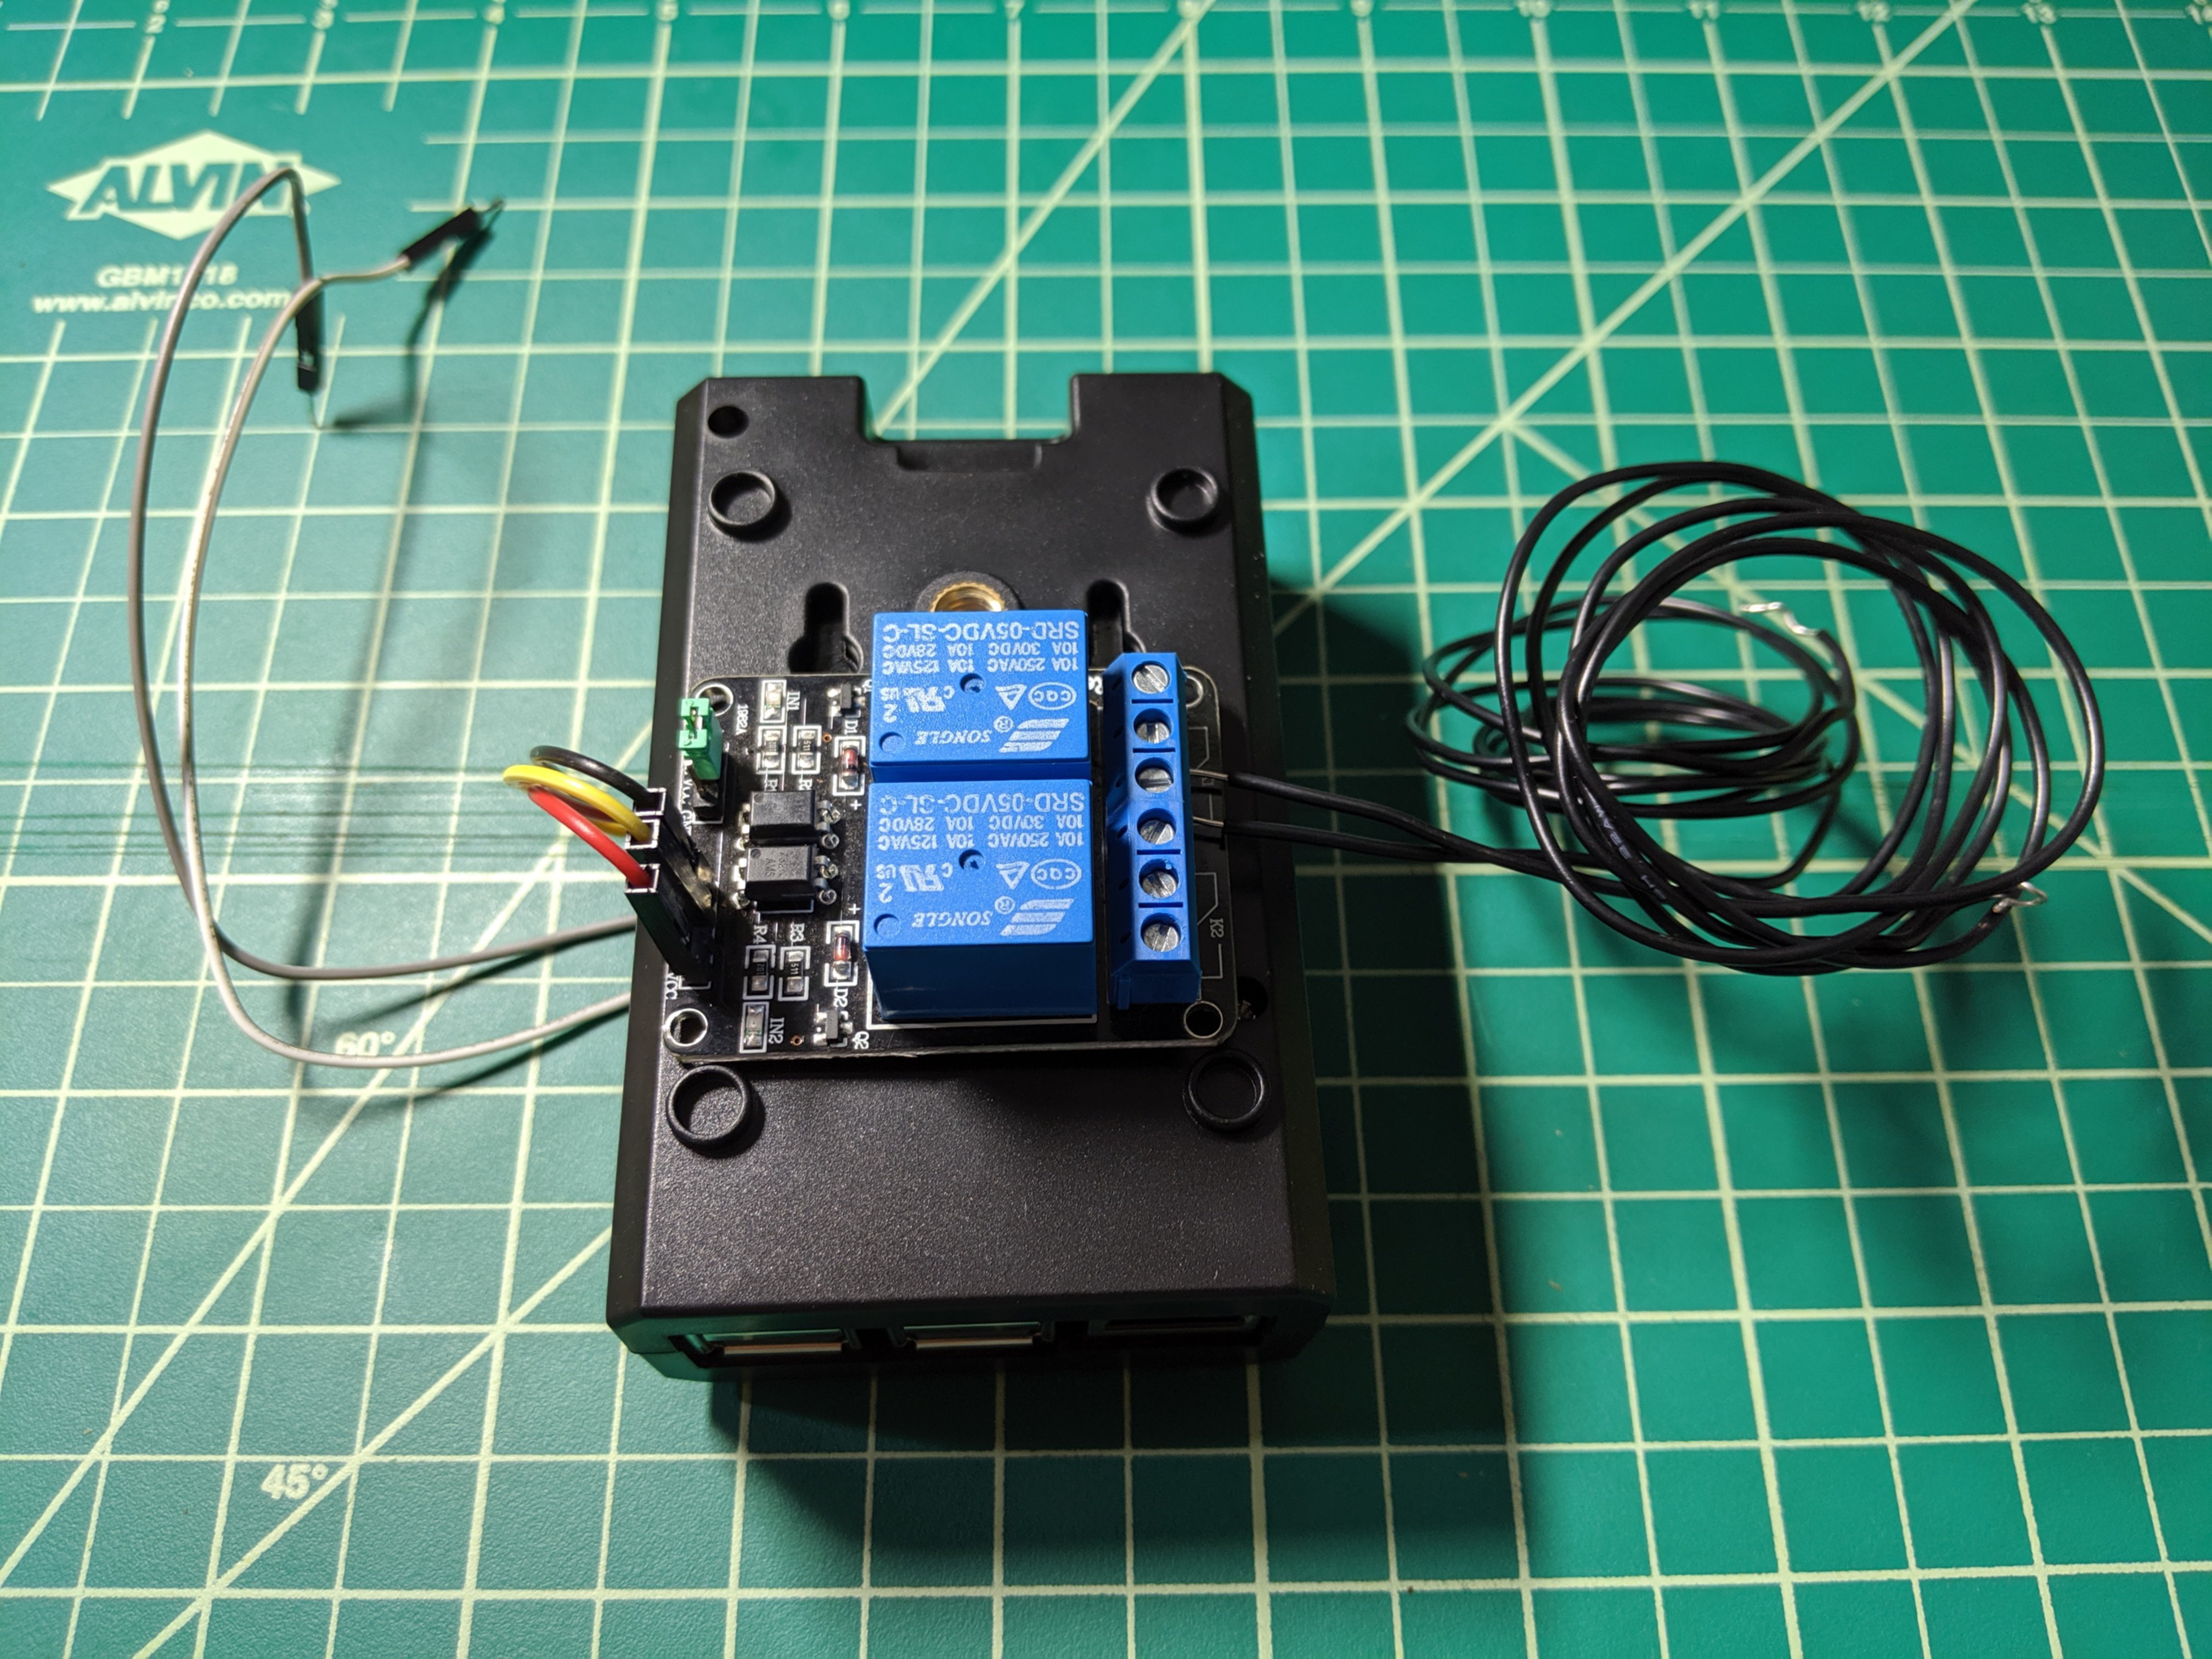
Step 6: Connect 5V relay to Raspberry Pi
- Red wire to VCC
- Black wire to GND
- Yellow wire to IN1

Step 7: Add jump wires to the common and normally open relay terminals. This makes it easier to attach and detach your relay from the motor
Step 8: Secure 5V relay to back of case using foam tape and tuck excess wire into the case. Ensure the relay does not cover the screw or prevent you from attaching the mount!
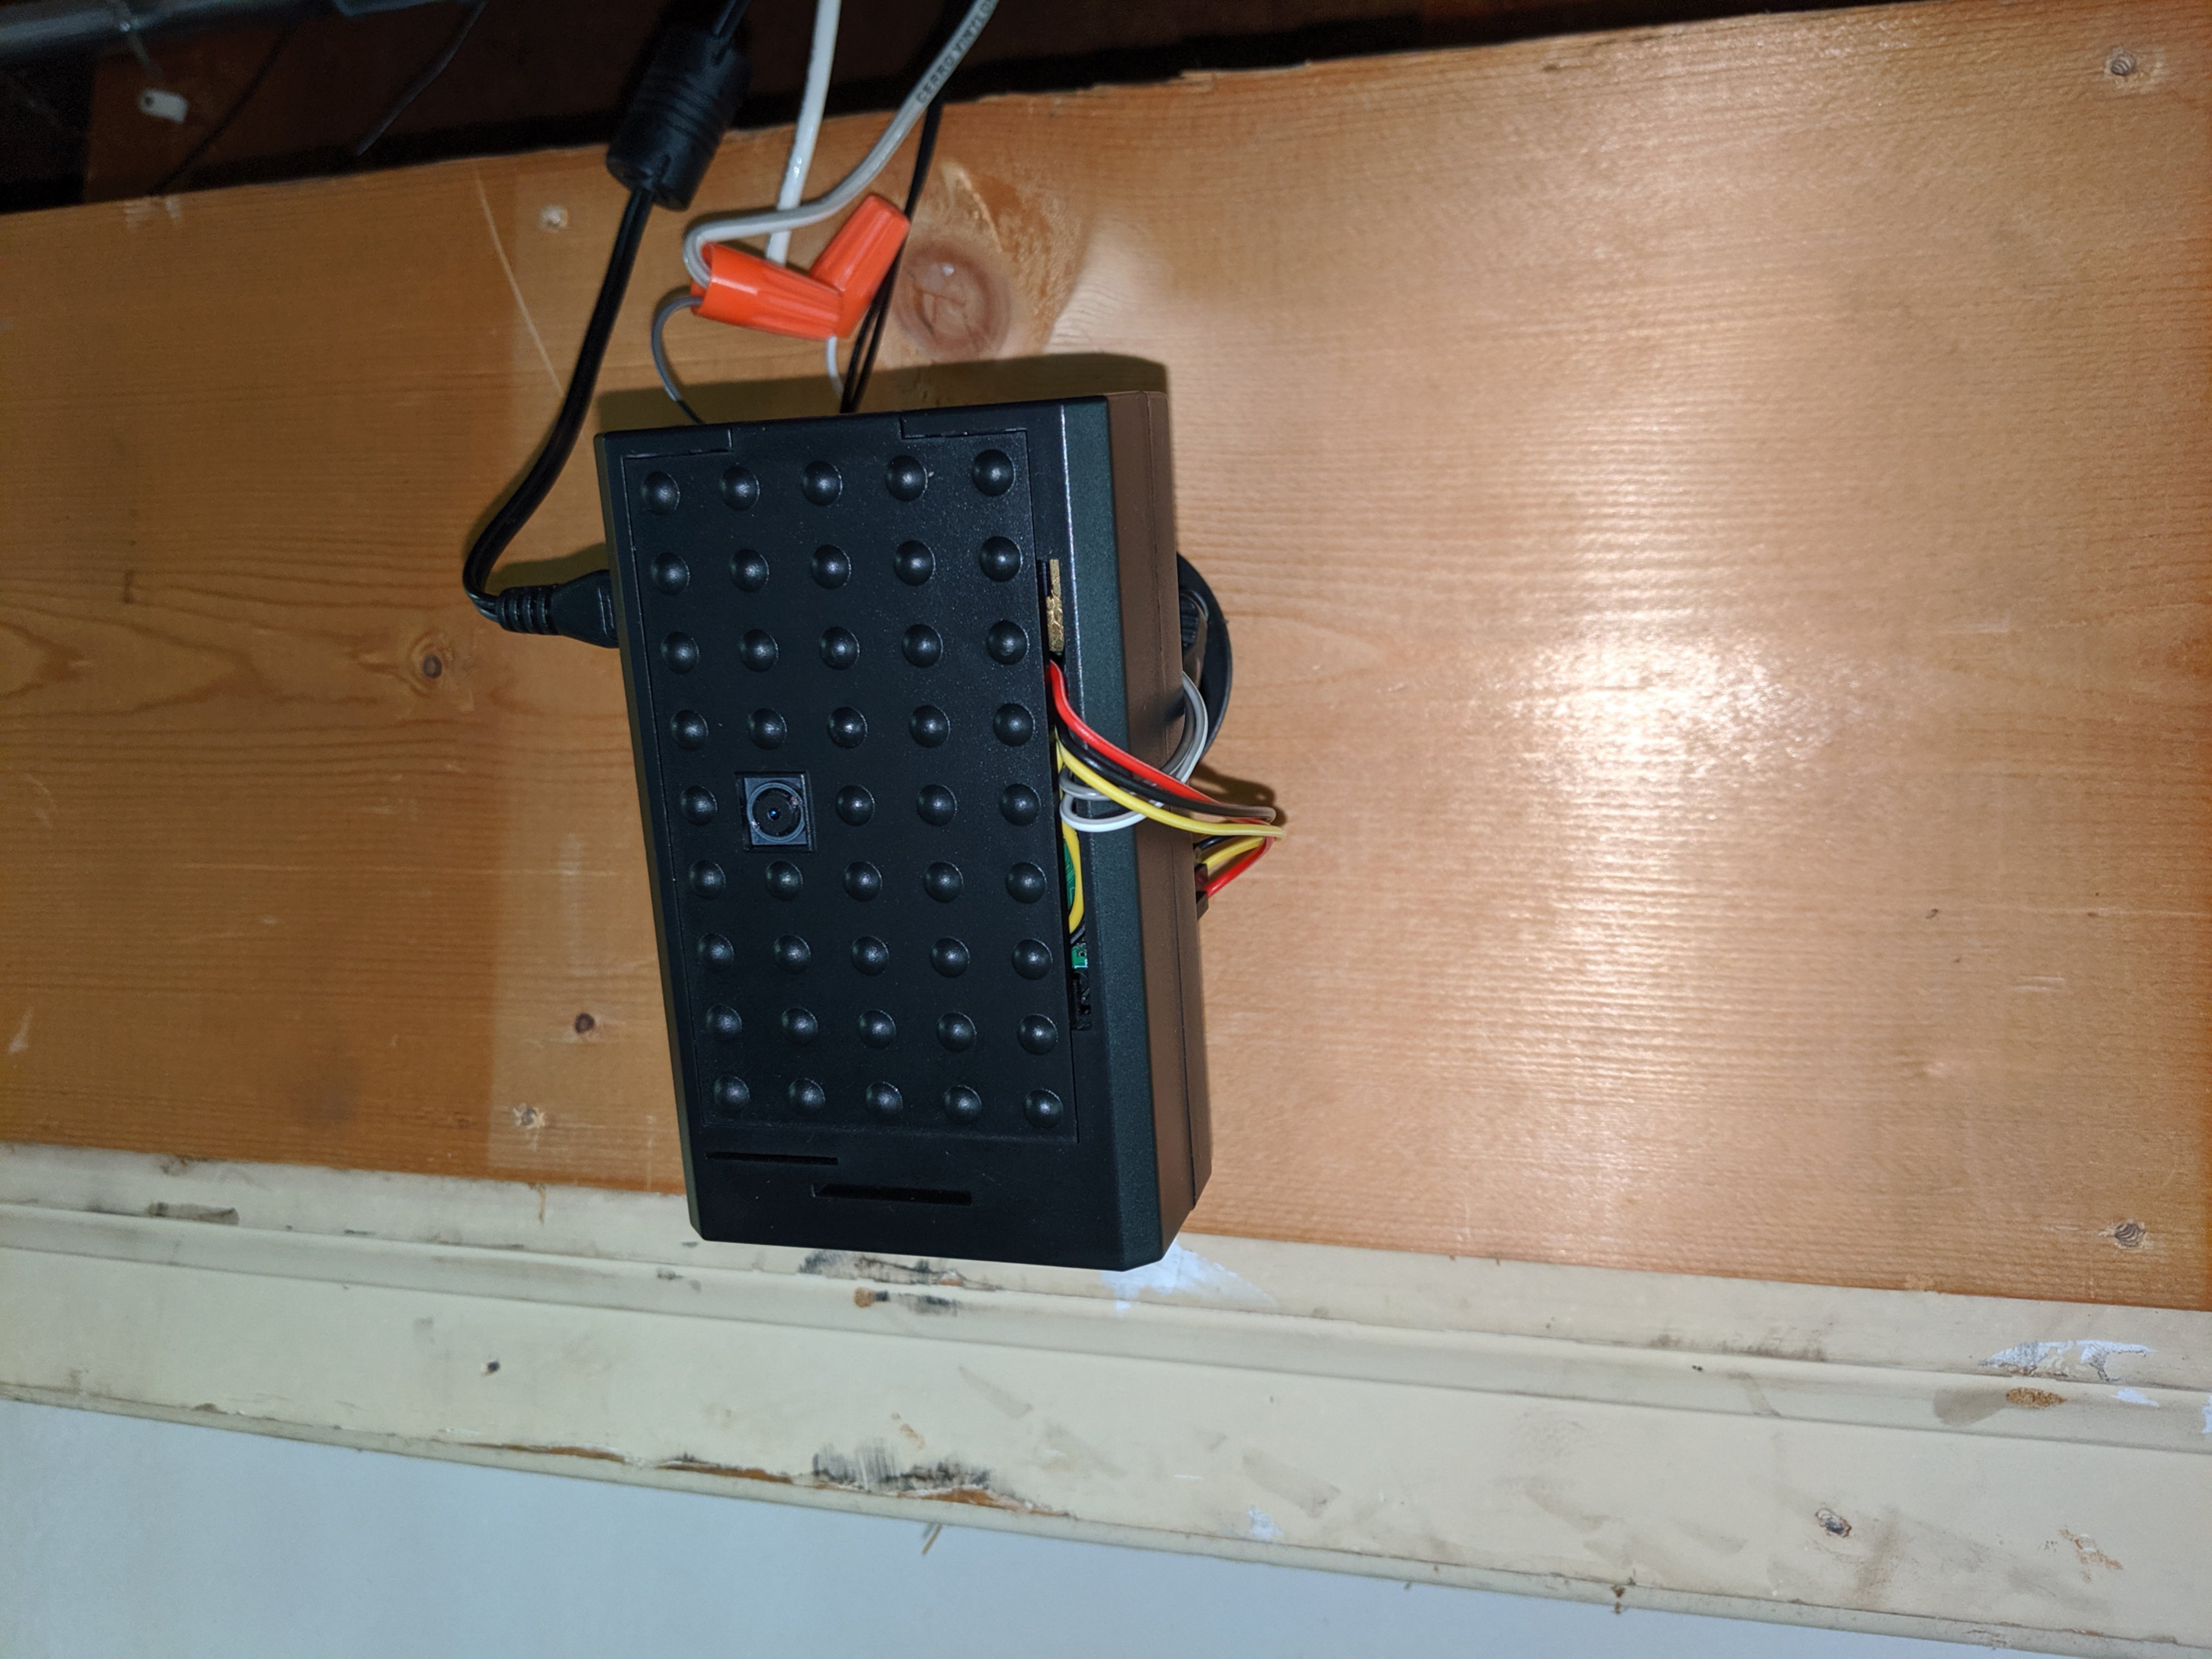
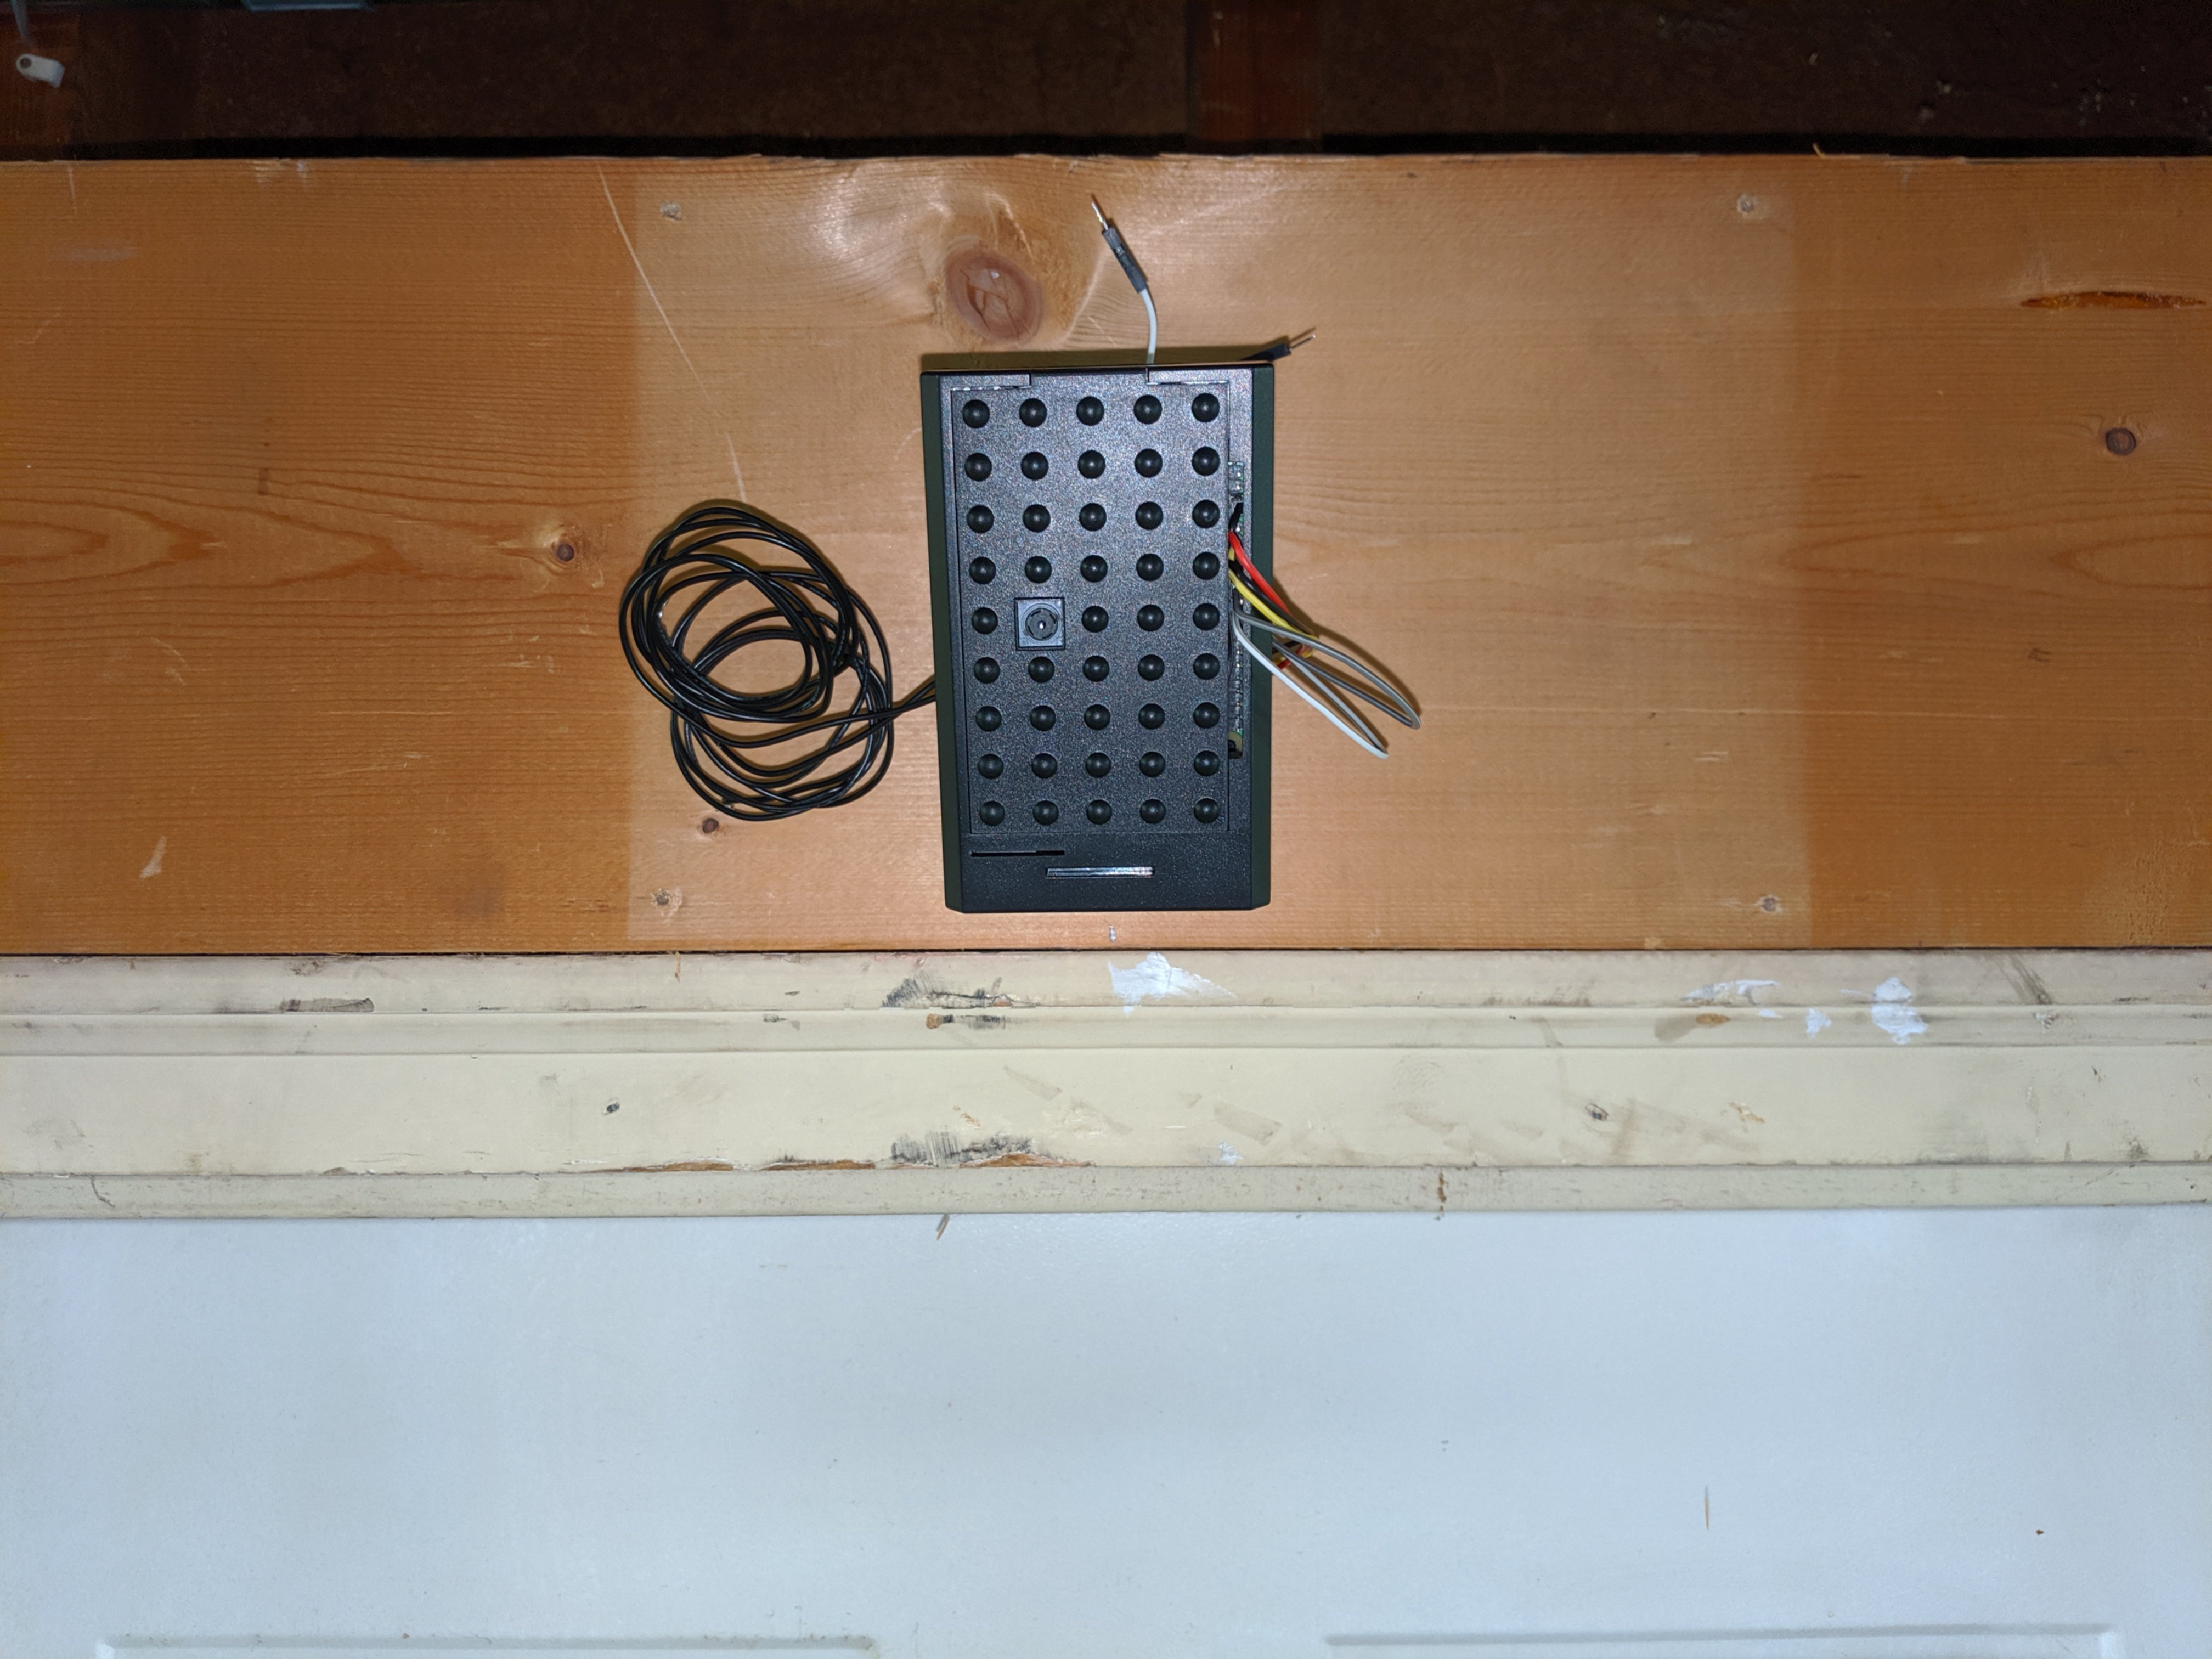
Mount your Raspberry Pi
Choose a location for your mount. Consider your field of view and how much wire you will have to run. Also make sure you have a Wi-Fi signal and can plug in your AC adapter and IR illuminator.
Use foam tape or the included screws to secure the mount to your garage. Screw your Raspberry Pi onto the mount.
Run wires to your garage motor
Unplug your garage door motor before you begin!
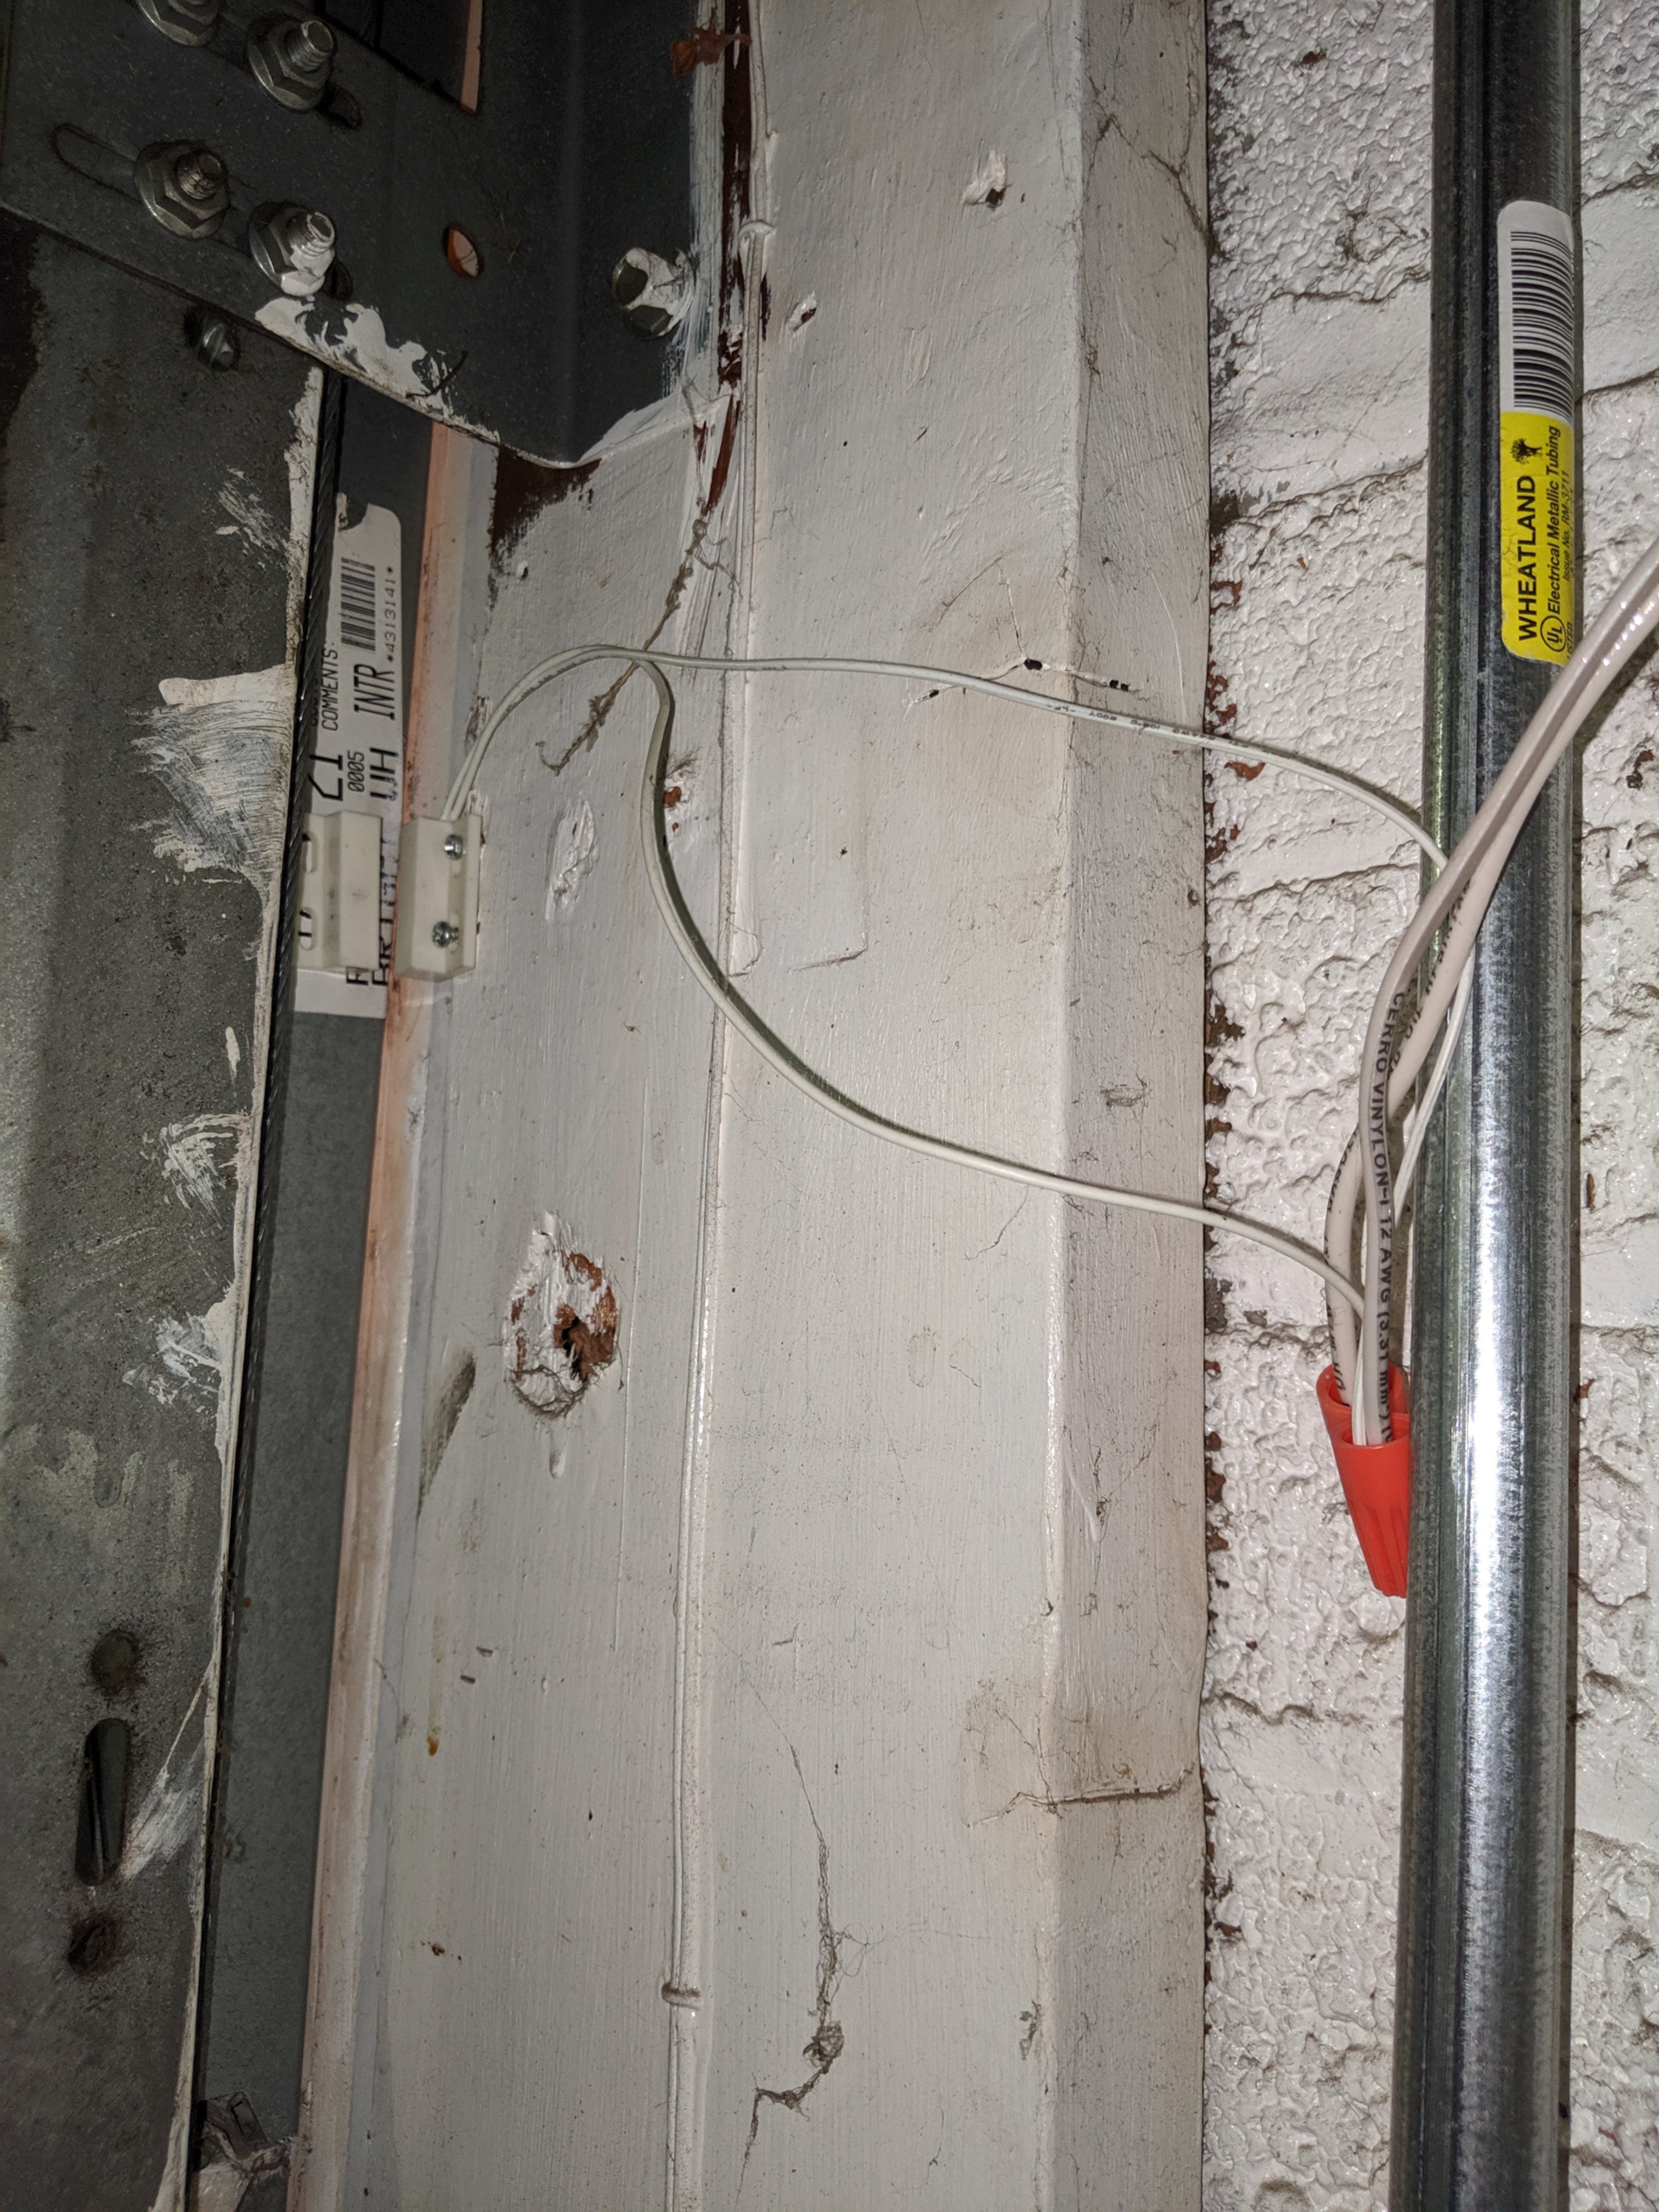
On the back of your garage door motor there are two terminals that control the door. You can find the terminals by tracing the wire from your wall mounted garage door opener. Refer to instructional videos from commercial smart garage openers for help (e.g. Momentum Smart Garage Opener).
You will need to connect another wire to each of these terminals and run them to your relay. If your Pi is near the wall mounted opener you can splice the existing wires and make pigtail connections.
Using wire nuts, connect one wire to the common terminal and the other wire to the normally open terminal on your relay. Restore power to your garage motor.
If the door begins to move: you are using the normally closed (NC) terminal on your relay. Unplug your garage motor and swap the wire to the normally open (NO) terminal on your relay.
Mount magnetic contact switch
Decide where to attach your contact sensor. The sensor needs to make contact when the garage door is closed.
Run two wires from your contact sensor to your Pi. Use wire nuts to connect each wire of your sensor to one of your sensor jump wires on your Pi.
Configure your Pi
- Power up your Pi
- Find the IP address of your Pi
- SSH into your Pi (Linux/macOS or Windows)
- Run
sudo raspi-config
- Select option 1 and change your password
- Select option 4 and change your time zone
- Select option 5 and enable your camera
- Run
sudo reboot
Install Docker
Paste the following into a new SSH session:
sudo -- sh -c "
  curl -fsSL https://get.docker.com | bash &&
  usermod -aG docker pi"
At the time of writing ARMv6 users (e.g. Pi Zero W) also need to downgrade containerd.
Finally sudo reboot, SSH back in, and docker run hello-world to test your
Docker install.
Set up motion capture
We’re going to use RPi-Cam-Web-Interface for our camera. Paste the following into your SSH session:
touch uconfig schedule.json
docker run \
  --name rpi-cam \
  --env "TZ=`cat /etc/timezone`" \
  --device /dev/vchiq \
  --device /dev/vcsm \
  --volume "$(pwd)/schedule.json:/var/www/schedule.json" \
  --volume "$(pwd)/uconfig:/var/www/uconfig" \
  --volume "$(pwd)/media:/var/www/media" \
  --publish 80:80 \
  --restart always \
  --detach \
  bakerba/rpi-cam
Open up a web browser and navigate to the address of your Pi to access your
camera. Edit the schedule settings to enable motion capture. Captures are
stored in ./media.
Start a web server
We’re going to use gpio_httpd to interact with our GPIO pins remotely. Run the following command in your SSH session:
docker run \
  --name gpio_httpd \
  --device /dev/gpiomem \
  --publish 8080:80 \
  --restart always \
  --detach \
  bakerba/gpio_httpd
Now we can run a couple tests
- Type
curl localhost:8080/input/17. You should see0if the door is closed or1if it is open - Type
curl -X POST localhost:8080/17/low?ms=250. This should activate your relay and open or close your garage door
Automate it
Now you can check and control your garage door with HTTP requests. These can be made from a script on your PC or an automation app on your phone, such as Shortcuts on iOS or Tasker on Android.
In an upcoming post I’ll show you how to integrate your garage door opener with Home Assistant. We will add a manual door control and set up some automations and notifications.